Showing posts with label pinterest. Show all posts

Sunday, 25 June 2017

Speedy Stitching


Sometimes you need to change things up a bit. I was like that the other night.

I've been in a quilt finishing frenzy recently - frantically trying to get a couple of quilts finished in time for the local show in a month - it felt like I was getting nowhere fast and I sort of lost my mojo.

A quick sew was in order and this little earbud pouch from Dog Under my Desk was just the thing.

Earbud Pouch - front
(from pattern and tutorial at Dog Under my Desk)

The great fabric the monster picked for the reverse of the earbud pouch

The monster chose the fabrics from my scrap stash, I just happened to have the perfect zip colour in my box of assorted randomness, and it came together in about half an hour.

This is a great, easy and super quick sew. I can see this little project becoming a regular in my repertoire of go-to last minute gifts.

Now back to quilting.

Until next time.

K

Monday, 13 March 2017

Half Square Triangles (HST) - trying a couple of methods

After realising that a lot of my personal challenge with the traditional blocks in the NQC Quilt Block Challenge was to do with the volume and monotony of the precision trimming involved, I went in search of easier ways.

And where do I go for help with most things crafty? Pinterest of course!

I came across a blog post / tutorial that reduces the amount of trimming on each HST piece from four trimming cuts to just two. With up to 16 HST pieces per block, that's going from up to 64 individual trim cuts, to 32. Definitely worth a try.

The normal method - recommended in the early instructions for the Challenge

  1. Lay two contrasting squares of fabric on top of each other, right sides together.
  2. Draw a diagonal line from corner to corner to corner.
  3. Stitch a scant 1/4 inch either side of the drawn line
  4. Cut on drawn line, between the 2 lines of stitching.
  5. Press open and trim.
Press the unfinished square open and line up the diagonal
on the ruler with the diagonal on the piece.
Trim all four sides.
Result = perfect HST piece

The 2-cut method

Follow steps 1-4 above, but from there the method changes.

The idea is that instead of pressing them open and then trimming all four sides you line up the diagonal line of the ruler with the stitching line, trim the two raw edges and then press them open.

Makes sense - its completely logical, there's no reason why it shouldn't result in perfect Half Square Triangles... except it didn't!
Diagonal on ruler lined up on stitching line
Ready to trim two sides only

The finished piece after pressing the 2-cut HST open

In addition to having little tails on the corners that still need to be trimmed off before stitching, somehow the finished piece did not end up square.

I still don't know how that happened! I was so careful to line up the ruler correctly, and I made sure it didn't move while cutting, but the finished piece speaks for itself.

The verdict

I have a hard enough time matching points and having block turn out the correct size without adding mis-sized and mis-shaped pieces into the mix.

It might take a little bit longer, but I'm resigned to sticking with the normal / 4-cut method.

I did come up with a little bit of a time and sanity saver though. I was in Spotlight the other day picking up some fabric for a last-minute gift (post about that coming soon) and I came across the cutest little cutting mat.

My new mini cutting mat 

The mini mat is 6x8 inches so it fits the unfinished HST pieces for the Challenge quilt nicely, but it's small enough to be able to spin around really easy on the bench without needing to shuffle around the sewing machine and all the other assorted bits and pieces I have surrounding me when I sew. (My larger cutting mats fit nicely in the available space with little room to spare - spinning them around mid-piece is just not an option.)

Now I don't have to reset my fabric and ruler each time I need to rotate it to trim each side of the HST piece, I just spin the whole cutting mat.

So after all that - a pinterest fail, but a semi-win with a practical new tool.


K


Thursday, 16 February 2017

Pinterest Reviews: Something sweet

I've already posted more in the first 2 months of this year than I did throughout all of 2015 & 2016 and I'm loving getting back into it.

I'm still spending way to much time on Pinterest, but I am still making an effort to put that time to use and actually making some of the things I've pinned.

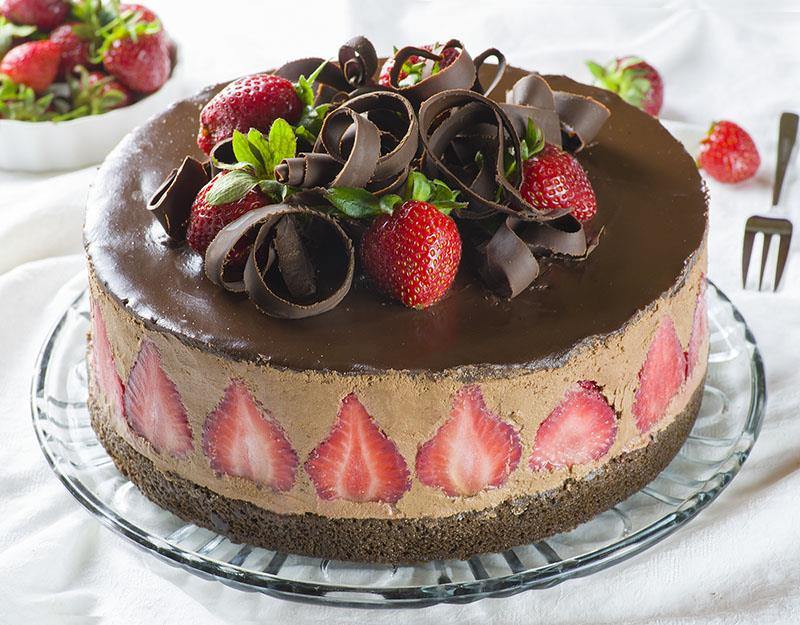
It was a work mates birthday recently so I took the opportunity to try out a recipe that I'd pinned a while ago that has been making me drool every time I skimmed over the picture on my boards.

The recipe is a Strawberry Chocolate cake from omgchocolatedesserts.com

It was a teensy bit fiddly with the multiple layers needing to be assembled; and taking the spring-form pan off the cake before serving was a little nerve wracking but it was so very worth it.

My version was definitely not as neat and precise as the pictures attached to the recipe, and my photography leaves a lot to be desired, but I was impressed!

To top off the visual impact this recipe has, it tasted pretty darn yummy too.


My attemptPinned image

My version of the Chocolate Strawberry cake

Chocolate Strawberry Cake from omgchocolatedesserts.com

A Pinterest success I think.

What have you been pinning recently?

K

Sunday, 14 December 2014

Pinterest Reviews

Its time I did another pinterest review post... Sadly no crafty stuff with this update - I really must get back into posting the crafting things!

Food

I've been cooking quite a bit recently - all sorts of stuff from savoury to sweet from salads to cookies but if you were to look through my pinterest "Stuff I've Tried" board anyone would think that its all sweet and sugar-filled (some have been, but definitely not all of them).

If you want to try any of these for yourself, just click on the recipe name to go directly to it.

Chocolate Chunk Peanut Butter Swirl Fudgy Cookies


One word - YUMMY!

These are without a doubt some of the best chocolate biscuits I've ever made/tasted. Serious chunks of chocolate that seems to stay soft and oozey combined with the saltiness of peanut butter and a lovely, slightly crumbly biscuit base tying it all together.

I've made this a few times now and the only change I make to the recipe is mix half and half crunchy and smooth peanut butter for a tiny bit more texture (and I forgot to add the baking soda to the last batch but they turned out OK so maybe that isn't essential either).


Salted Caramel and Chocolate Pecan Pie Bars

Salted Caramel and Chocolate Pecan Pie Bars
Recipe and pic from www.averiecooks.com 

Decadence plus. These were a huge hit when I took them to a work morning tea. They are a bit messy to eat, but most people did not have an issue with that and they disappeared pretty quickly.

This one was surprisingly easy to make and well and truly satisfied the craving I had been having for pecan pie, while also providing a really good chocolate hit (one can never have too much chocolate). 

One thing I was pleased about with this recipe was that when cut and served carefully, my version of these bars looked almost identical to the promo pics - That doesn't happen very often and its such a nice feeling when it does all come together.


Cinnamon Rolls

24-hour Cinnamon Rolls
Recipe and pic from: www.madeitateitlovedit.com
I know cinnamon rolls are a fairly American thing, but I'm just about ready to start lobbying to make them an Australian tradition!

My latest attempt at cinnamon rolls was made using the recipe from Made it. Ate it. Loved it. and again were a huge hit at work - even with my (formerly) American boss.

A word of warning if you are going to use this recipe - it makes a LOT!

I didn't have the 10 cups of flour the recipe calls for on hand (and I don't think I have a mixing bowl big enough to handle a recipe that large anyway) so I halved the recipe and still ended up with 3 trays of cinnamon rolls.

The bonus with this recipe is that most of the work (and its not really a lot of work anyway) is done the night before so in the morning all you need to do is pop them in the oven for about 15 minutes and then glaze them.  Nothing better than a warm sticky cinnamon roll with a cup of hot, strong coffee for morning tea.


Cleaning stuff

yeah, all the boring stuff...

Shower screens 

My pinned source - a post on  askannamoseley.com 
Don't get me wrong, I'm still loving my beautiful bathroom, but I never realised just how grotty glass shower screens could get. They are not something I've had to deal with before having only ever had a curtain at most.

We were doing OK making sure that we use the squeegee fairly regularly after showers and keeping it reasonably nice, but it just doesn't give it a really good deep clean by itself so last weekend I was determined to get in there and clean the glass properly. I scrubbed and scrubbed with windex but it  wasn't getting through the hard water stains to my satisfaction. So where do I turn? My source of all things domestic - Pinterest of course! and again it delivered for me.

The secret - magic erasers... those funny little squares of dense sponge (I think they are melamine based) that are apparently good for cleaning all sorts of things.

And the results? They speak for themselves. Both doors in the pic below had been cleaned - the one on the right with just windex, the one on the left with the magic eraser and then windex. I think we have a winner!
On the right - shower screen after scrubbing with just windex
On the left - scrubbed with magic eraser, followed by a gentle wipe with windex
I probably should turn my attention towards more festive topics and crafty stuff for my next post, and with 3 weeks off work, hopefully there will be some more crafting and blogging happening.

Until next time

K

Tuesday, 6 August 2013

More justification of the pinterest addiction - Food!

Its been a while now since my last post like this but I am still making a conscious effort to not just browse for hours but actually use stuff I find so here's's a few more pinterest reviews. This time the focus is squarely on food.

Raw walnut brownies

Raw walnut brownies by The Wannabe Chef
This one ticks all the right boxes - dairy, egg and refined sugar free, lots of good oils from the nuts. Such a simple idea, super healthy and surprisingly really yummy.

I just processed all the ingredients together (minus the water - it wasn't necessary), rolled the mix into bite-sized balls and popped them in the fridge. I was a bit skeptical because the mix looks really crumbly but I found that as long as they are rolled/shaped firmly there is no problem with the balls holding together, especially after they've been in the fridge for a little while.

Next time I make these I might substitute half the walnuts for almonds or maybe add a smidge of vanilla just to slightly lessen that distinct bitter walnut smell that we got hit with each time we opened the sealed container I had stored them in - the walnut taste was really not that strong but the aroma could be a little bit off-putting if you are not a big walnut fan.

These are a great healthy alternative to chocolate, cake or biscuits when you have that late-afternoon or after dinner sugar craving. Because there is absolutely nothing unhealthy in these it was great not having to be constantly saying no whenever the monster asked for "just another chocolate".

Healthy Gummy Bears

These are the absolute best things ever!! I could eat these all day long.

I've made these a few times now and have tried banana, vanilla-raspberry and mixed berry flavored varieties. Sadly I don't have a mini bear shape cutter so I've had to make do with little cubes cut with a knife but I don't think that affects the taste too much :)

Its so simple
  • 1 Cup  Fruit Juice 
  • 2 Cups Fresh or frozen fruit 
  • 5 Tbsp Unflavored gelatin 
  • 1  Tbsp honey. 
Simmer the fruit and juice together in a pot until soft, let it cool a bit, add honey, puree until smooth. Add gelatin, blend/puree some more and pour into a tray.

Refrigerate until firmly set (I usually just leave overnight), cut into pieces with a sharp knife and transfer pieces to an airtight container. Store in the fridge.

Only a couple of little, but important notes with this one:
  • If you use fruit with lots of little seeds eg strawberries or raspberries remember to strain the cooked fruit before adding the gelatin or your gummy things will be a bit crunchy. 
  • Don't expect these to taste or feel like your traditional artificial store bought gummy bears - they can definitely get "gummy" but its not the same as a gummy bear, and the flavour is that of real fruit, not lollies. They can be as sweet as you make them, but I prefer them a bit tangy so I don't usually add a whole heap of honey to sweeten.

Herb & Citrus Chicken -  Pinned Version

Herb and Citrus Oven Roasted Chicken

I made this with skinless chicken lovely legs; other than that it was made exactly as per the recipe.

I thought it was really yummy - juicy, citrus and fresh tasting but the rest of the family didn't enjoy it as much so unfortunately this one won't become a family dinner regular.

Definitely one that is worth a try if your family isn't as fussy as mine.

Slowcooker Apple & cinnamon porridge (oatmeal)

Apple and cinnamon porridge
You remember my aversion to eating in the morning right?  I thought I'd try this recipe in my efforts to make breakfast time less stressful. The idea and the ingredients sound great but sadly this one just didn't cut it.

I set it all in the slowcooker before going to bed and woke in the morning to a heavenly cinnamon smell wafting through the house.

Perhaps I used the wrong variety of apples (I used granny smiths), or maybe the extended cooking time is just not suited to apples because despite the lovely smell this just ended up completely bland and goopy and was a nightmare to clean out of the slowcooker bowl. Great idea, not so great in practice.


Well that's it from me for now. But if you're looking for more food inspiration make sure you head over and check out my favourite new food blog "Baking with Gab" created by my gorgeous cousin Gabby. She makes me hungry just reading her posts and her photography of her delicious delights (and Norman the dog)  is infinitely better than any of the poor quality phone pics that I tend to post here.

Have fun

K

Thursday, 20 June 2013

Show Quilts 2: Wall hanging / pictorial art decisions

With the lap quilt mostly decided the next one is the wall hanging or pictorial art quilt.

There are so many concepts swirling around in my head at the moment I could probably do ten different quilts! Not that I'm going to - I just don't have the time for that right now.

The show guidelines specify a maximum size of 1.5m x 1.5m but as long as it doesn't exceed that maximum it could be any size or shape that I want. Creativity in fabric choice, embellishment, piecing and quilting technique is encouraged in this category.

Most of my ideas could fall into 3 broad categories - places, animals and abstracts. 

Places

So I could do a stylised landscape. Something along the lines of the one below - simple lines, simple quilting, easily recognisable as a landscape but not necessarily anywhere in particular.
Stylised landscape
Or I could try to recreate a photo image like one of the ones below. It would obviously end up being much less detailed than the actual photos (in reality they would probably turn out a lot like the quilt in the picture above). I do really like the last image though - there's some definite scope for experimenting with different techniques and fabrics, possibly even some mesh or lace to represent the seafoam?

Another one that came into my head the other night that I just can't seem to shake is to recreate a map - I'm specifically thinking about a cyclone tracking map. I'd probably need to simplify it slightly (omit the scale bar and the text used for place names, dates and times) but I can see this coming together in my head - only a few fabrics, different coloured stitching for the coastline, cyclone track and warning circles an possibly a thin translucent fabric overlaid/appliqued on top of the quilt for the grey/shaded area?


Animals

How about using mostly a single fabric and using the quilting stitches to give shape, texture and definition? A closeup of a green tree python or a frog in a duckweed filled pond would be perfect for this kind of thing.

Or a more cuddly animal, using faux fur for the actually critter?

Abstracts

While I'm calling this category abstracts, not all of them really are. I guess these are the ideas that just aren't animals or places. As there is the option of doing a slightly more traditional quilt as a wall hanging I've also included those more "quilty" inspirations here.


As I said before - so many options and ideas. I think I might put this one aside for now, focus on getting the lap quilt done first and then revisit it. Four weekends to go until submission date....

Have fun.

K

A little note on the images in this post: none of the images that I've posted above as my inspirations are my own and I know that I've not credited them to anyone - I've been pulling images of things that pique my interest from the web for weeks but sadly I've  neglected to keep track of where they've all come from - if any of these are yours please let me know and I'll either add credit or remove them if you wish .

Saturday, 15 June 2013

Show Quilts - too many ideas!

So I went ahead and submitted my entries for the show. I couldn't decide which one so I'm entered in four categories!

It sounds like I may have bitten off more than I can chew but I'm not too stressed about it simply because if I do make the deadline then I will have forced myself to complete projects that I had been wanting to do anyway which would be wonderful. If I don't end up with a suitable entry by the deadline for one (or more) of the categories it doesn't really matter; the entry fee for each category was next to nothing so I'm not losing tonnes if I don't make it.

I already know what I'm doing for the bag and knitting categories, those are just a matter of getting stuck in and doing it; the quilt categories though? I have so many ideas running around in my head!

I've entered in two quilting categories:

  • LAP QUILT max size 1.5m x 1.5m
  • PICTORIAL ART OR WALL HANGING, (pictorial quilt must portray a recognisable subject). Maximum size 1.2m x 1.2m. Exhibits must demonstrate some of the following elements: creative piecing, embellishments, creative stitching, and innovative quilting.

As well as the official requirements I've also got a few of my own parameters:
  • Must not be too intricate or time consuming - I've only got 5 weeks to pull this off so I don't want to be spending weeks cutting and piecing millions of tiny little blocks!
  • While being simple in design/piecing they still need to be interesting enough to draw in the viewer/judges.
  • At least one of the quilts must incorporate shades of green solids - I bought several shades of green fabric last weekend and I need to justify the purchase by actually using them in the near future (the other half was with me when I bought them).
  • Must use washable fabrics and no large expanses of pale colour (the exception to this would be if I decide to do a wall hanging or really arty quilt for the 2nd category). If I keep the quilts after the show I want to be able to actually use them.  I don't want to have them languish in a cupboard or drawer because I'd need to clean them all the time or be worried that a small coffee stain or something might ruin the niceness. A quilt is meant to be seen and used and loved.
So with the design parameters in mind I've been looking through all my inspiration pins and playing around in inkscape trying to decide what I'll do.

I've narrowed it down to six options (listed below in no particular order) that would be viable as a lap or baby/cot sized quilt. Some of these are very heavily based on the inspiration quilts but with differences in colour choice, quilting and placement of elements they should end up fairly unique.

Lap quilt option 1:
Green Gradient
Option 1: Green Gradient
Pros:
Its simple (therefore super fast to put together)
Should be offset nicely with really simple straight line quilting
Cons:
Is it too simple?
If I mess up the alignment of blocks or quilting even slightly its going to be glaringly obvious when its hung up and on show.


Lap quilt option 2:
Grass Clippings

Option 2: Grass Clippings
Inspired by all the  shattered glass quilt that I've been eyeing off recently.
Pros:
Intricate quilting probably not needed on the bulk of the quilt..
The slash and strip method to make the blocks doesn't need accuracy or lots of measuring (variation is a good thing with these blocks).
Cons:
Is it too busy looking?
Will it be too time consuming?
There's a lot of pale fabric (might be possible to invert the colours?)


Lap quilt option 3:
Stars
Option 3: Stars
Pros:
Simplicity
Great opportunities for interesting quilting in the background areas.
Cons:
I haven't done stars/triangles in a quilt yet - it would be a steep learning curve.
Green doesn't really work with this design (but I could use the greens with the other  quilt category or the bag).


Lap quilt option 4:
Bubbles
Option 4: Bubbles
Pros:
I love circles
Cons:
Too retro?
Has potential to look messy.
Perfect circles are tricky.
Could get a bit bulky and stiff where all the circles lay on top of each other.


Lap Quilt option 5:
Marble Run
Option 5: Marble Run
Pros:
Simple
Cons:
Possibly needs up to 3 different quilting techniques/patterns on the different elements


Lap quilt option 6:
Drippy
Option 6: Drippy
Pros:
It looks simple and elegant
Cons:
There is a bit more cutting and piecing involved in this one than some of the other options


All of the possibilities are probably achievable in the time I have available and I really like them all. Unfortunately there is no way that I will have time to make six different quilts just so I can have the option of being able to decide later which one to enter. See the dilemma?

Which one do you like best?

K

Tuesday, 30 April 2013

Pinned - fighting or feeding the Pinterest addiction?

I've become such a Pinterest addict over the last few months its bordering on ridiculous. I've gone from not even having heard of the site at Christmas to having 12 boards and over 2000 "pins" (check out all my boards and pins here). I could easily lose a weekend scrolling through images dreaming and scheming (with a few laughs and some drooling at pretty boys thrown in for good measure - it can't always be crafting and cooking and homey stuff!).

So I don't feel like a complete addict wasting all of my time on the silly site, I've decided to actually put some of those 2000+ pins to use - try some stuff, make some stuff, generally do something more active than just look. It could be said that its just an excuse to keep browsing the site day after day, but whatever, I'm having fun at the moment just trying stuff out.

So what have I been up to so far you ask?

Well, there was the baked oatmeal casserole that I mentioned in an earlier post.
This is what the pinned image looked like:

And this is how mine turned out (after the custard pouring and cooking obviously):
It was sooo yummy and the smell while it was cooking was just divine - cinnamon and sweet - it was making me so hungry I couldn't wait to try it as soon as it came out of the oven.
A definite win!

Then there was the lemon sugar scrub, billed as giving you "Super Silky Summer Legs".
I really wasn't sure about this one as I mixed it up. How could anything so simple (its only got 3 ingredients)  and obviously foodstuff have this magical effect of making my super dry, nasty legs silky and summery? Well I was definitely proven wrong. My legs felt awesome after using this - it exfoliated so well and made my skin feel so nice that I ended up using it all over - legs, arms, face.

There were a couple of really minor downsides to this one:
  1. The bathroom ended up kind of oily, its impossible not to slop this goopy stuff around when you're scrubbing this all over yourself. Even followed with a bit of a wipe with soapy cleany stuff  and a scalding hot water rinse down the shower walls and floor still felt a tiny bit oily - really it was barely noticeable, but I was warning everyone else in the house for the next 2 days to be very careful not to slip when they showered .
  2. Although my skin felt wonderfully smooth and moisturised I felt like every time I got even slightly heated (pretty much any time I stepped out of the air-conditioning here in the tropics) that my pores, especially my legs, were oozing olive oil - they weren't, but it felt like they were.
Even with the downsides, the benefits of this one outweigh the negatives for me. I might use a bit less olive oil next time and be more careful not to slop so much around the bathroom but I'll definitely be using this again.
Another win!

As with most of my web-browsing the monster has been looking over my shoulder a lot and has gotten really interested in macramé/beading/bracelet making - I've now got a whole board dedicated to jewellery, string & rope stuff and a shopping bag full of embroidery and crochet thread in every colour of the rainbow not to mention boxes of beads all over the place. We're working through some of the different type of friendship bracelets together - no pics of these, they generally get taken to school and gifted to the monsters friends almost as fast as we can churn them out, but its keeping the monster busy. I'm stunned at how dextrous her little fingers are getting - she's a braiding whiz!

Quiet mum & daughter time creating stuff - yet another win!

There's a few other bits and pieces that I've tried over the last few weeks but most of them are just common sense or practical, boring, cleaning type things that I just needed a gentle reminder about to go and try again so I won't share them all now. There are still quite a few more things on my "To do list" pinterest board so as I get to them I'm sure I'll be writing more about them.

Have fun and beware the addictive nature of Pinterest! :)

K